中文 | English | 日本語 | Français | Español

🤗 Hugging Face | 🤖 ModelScope | 📑 Paper | 🖥️ Demo
WeChat (微信) | Discord | API | Web | APP

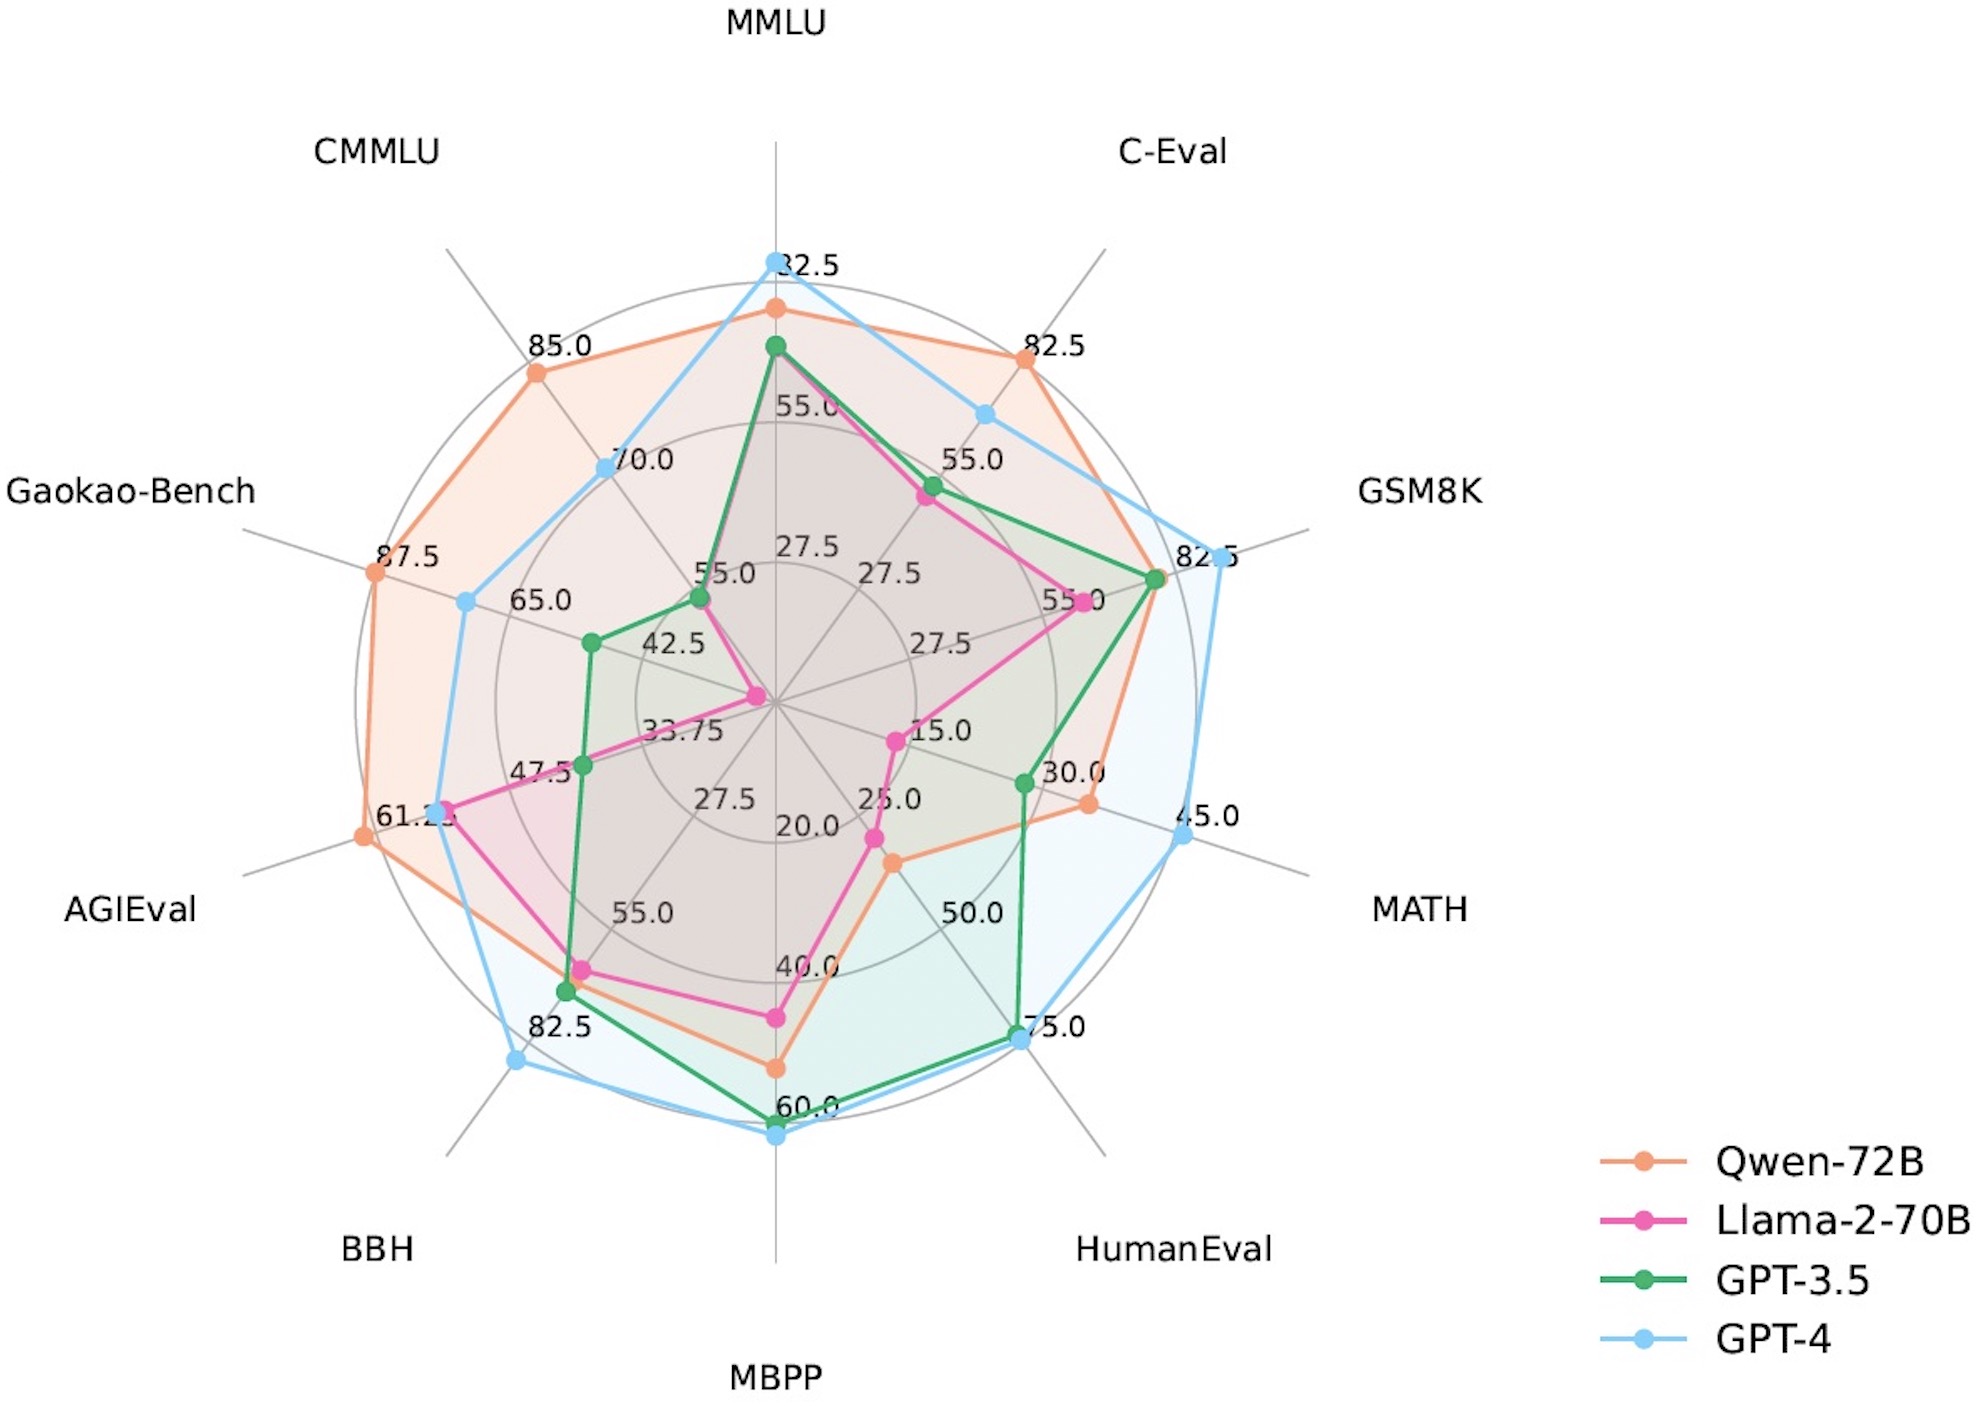
| Model | MMLU | C-Eval | GSM8K | MATH | HumanEval | MBPP | BBH | CMMLU |
|:-------------------|:--------:|:--------:|:--------:|:--------:|:---------:|:--------:|:--------:|:--------:|
| | 5-shot | 5-shot | 8-shot | 4-shot | 0-shot | 3-shot | 3-shot | 5-shot |
| LLaMA2-7B | 46.8 | 32.5 | 16.7 | 3.3 | 12.8 | 20.8 | 38.2 | 31.8 |
| LLaMA2-13B | 55.0 | 41.4 | 29.6 | 5.0 | 18.9 | 30.3 | 45.6 | 38.4 |
| LLaMA2-34B | 62.6 | - | 42.2 | 6.2 | 22.6 | 33.0 | 44.1 | - |
| ChatGLM2-6B | 47.9 | 51.7 | 32.4 | 6.5 | - | - | 33.7 | - |
| InternLM-7B | 51.0 | 53.4 | 31.2 | 6.3 | 10.4 | 14.0 | 37.0 | 51.8 |
| InternLM-20B | 62.1 | 58.8 | 52.6 | 7.9 | 25.6 | 35.6 | 52.5 | 59.0 |
| Baichuan2-7B | 54.7 | 56.3 | 24.6 | 5.6 | 18.3 | 24.2 | 41.6 | 57.1 |
| Baichuan2-13B | 59.5 | 59.0 | 52.8 | 10.1 | 17.1 | 30.2 | 49.0 | 62.0 |
| Yi-34B | 76.3 | 81.8 | 67.9 | 15.9 | 26.2 | 38.2 | 66.4 | 82.6 |
| XVERSE-65B | 70.8 | 68.6 | 60.3 | - | 26.3 | - | - | - |
| **Qwen-1.8B** | 45.3 | 56.1 | 32.3 | 2.3 | 15.2 | 14.2 | 22.3 | 52.1 |
| **Qwen-7B** | 58.2 | 63.5 | 51.7 | 11.6 | 29.9 | 31.6 | 45.0 | 62.2 |
| **Qwen-14B** | 66.3 | 72.1 | 61.3 | 24.8 | 32.3 | 40.8 | 53.4 | 71.0 |
| **Qwen-72B** | **77.4** | **83.3** | **78.9** | **35.2** | **35.4** | **52.2** | **67.7** | **83.6** |
对于以上所有对比模型,我们列出了其官方汇报结果与[OpenCompass](https://opencompass.org.cn/leaderboard-llm)结果之间的最佳分数。
更多的实验结果和细节请查看我们的技术备忘录。点击[这里](https://qianwen-res.oss-cn-beijing.aliyuncs.com/QWEN_TECHNICAL_REPORT.pdf)。
## 要求
* python 3.8及以上版本
* pytorch 1.12及以上版本,推荐2.0及以上版本
* transformers 4.32及以上版本
* 建议使用CUDA 11.4及以上(GPU用户、flash-attention用户等需考虑此选项)
## 快速使用
我们提供简单的示例来说明如何利用🤖 ModelScope和🤗 Transformers快速使用Qwen-7B和Qwen-7B-Chat。
你可以使用我们预构建好的Docker镜像,省去大部分配置环境的操作,详情见[“使用预构建的docker镜像”](#-使用预构建的docker镜像)一节。
如不使用Docker,请确保你已经配置好环境并安装好相关的代码包。最重要的是,确保你满足上述要求,然后安装相关的依赖库。
```bash
pip install -r requirements.txt
```
如果你的显卡支持fp16或bf16精度,我们还推荐安装[flash-attention](https://github.com/Dao-AILab/flash-attention)(**当前已支持flash attention 2**)来提高你的运行效率以及降低显存占用。(**flash-attention只是可选项,不安装也可正常运行该项目**)
```bash
git clone https://github.com/Dao-AILab/flash-attention
cd flash-attention && pip install .
# 下方安装可选,安装可能比较缓慢。
# pip install csrc/layer_norm
# 如果flash-attn版本高于2.1.1,下方无需安装。
# pip install csrc/rotary
```
接下来你可以开始使用Transformers或者ModelScope来使用我们的模型。
### 🤗 Transformers
如希望使用Qwen-chat进行推理,所需要写的只是如下所示的数行代码。**请确保你使用的是最新代码,并指定正确的模型名称和路径,如`Qwen/Qwen-7B-Chat`和`Qwen/Qwen-14B-Chat`**
```python
from transformers import AutoModelForCausalLM, AutoTokenizer
from transformers.generation import GenerationConfig
# 可选的模型包括: "Qwen/Qwen-7B-Chat", "Qwen/Qwen-14B-Chat"
tokenizer = AutoTokenizer.from_pretrained("Qwen/Qwen-7B-Chat", trust_remote_code=True)
# 打开bf16精度,A100、H100、RTX3060、RTX3070等显卡建议启用以节省显存
# model = AutoModelForCausalLM.from_pretrained("Qwen/Qwen-7B-Chat", device_map="auto", trust_remote_code=True, bf16=True).eval()
# 打开fp16精度,V100、P100、T4等显卡建议启用以节省显存
# model = AutoModelForCausalLM.from_pretrained("Qwen/Qwen-7B-Chat", device_map="auto", trust_remote_code=True, fp16=True).eval()
# 使用CPU进行推理,需要约32GB内存
# model = AutoModelForCausalLM.from_pretrained("Qwen/Qwen-7B-Chat", device_map="cpu", trust_remote_code=True).eval()
# 默认使用自动模式,根据设备自动选择精度
model = AutoModelForCausalLM.from_pretrained("Qwen/Qwen-7B-Chat", device_map="auto", trust_remote_code=True).eval()
# 可指定不同的生成长度、top_p等相关超参
model.generation_config = GenerationConfig.from_pretrained("Qwen/Qwen-7B-Chat", trust_remote_code=True)
# 第一轮对话
response, history = model.chat(tokenizer, "你好", history=None)
print(response)
# 你好!很高兴为你提供帮助。
# 第二轮对话
response, history = model.chat(tokenizer, "给我讲一个年轻人奋斗创业最终取得成功的故事。", history=history)
print(response)
# 这是一个关于一个年轻人奋斗创业最终取得成功的故事。
# 故事的主人公叫李明,他来自一个普通的家庭,父母都是普通的工人。从小,李明就立下了一个目标:要成为一名成功的企业家。
# 为了实现这个目标,李明勤奋学习,考上了大学。在大学期间,他积极参加各种创业比赛,获得了不少奖项。他还利用课余时间去实习,积累了宝贵的经验。
# 毕业后,李明决定开始自己的创业之路。他开始寻找投资机会,但多次都被拒绝了。然而,他并没有放弃。他继续努力,不断改进自己的创业计划,并寻找新的投资机会。
# 最终,李明成功地获得了一笔投资,开始了自己的创业之路。他成立了一家科技公司,专注于开发新型软件。在他的领导下,公司迅速发展起来,成为了一家成功的科技企业。
# 李明的成功并不是偶然的。他勤奋、坚韧、勇于冒险,不断学习和改进自己。他的成功也证明了,只要努力奋斗,任何人都有可能取得成功。
# 第三轮对话
response, history = model.chat(tokenizer, "给这个故事起一个标题", history=history)
print(response)
# 《奋斗创业:一个年轻人的成功之路》
```
运行Qwen同样非常简单。
运行Qwen
```python
from transformers import AutoModelForCausalLM, AutoTokenizer
from transformers.generation import GenerationConfig
# 可选的模型包括: "Qwen/Qwen-7B", "Qwen/Qwen-14B"
tokenizer = AutoTokenizer.from_pretrained("Qwen/Qwen-7B", trust_remote_code=True)
# 打开bf16精度,A100、H100、RTX3060、RTX3070等显卡建议启用以节省显存
# model = AutoModelForCausalLM.from_pretrained("Qwen/Qwen-7B", device_map="auto", trust_remote_code=True, bf16=True).eval()
# 打开fp16精度,V100、P100、T4等显卡建议启用以节省显存
# model = AutoModelForCausalLM.from_pretrained("Qwen/Qwen-7B", device_map="auto", trust_remote_code=True, fp16=True).eval()
# 使用CPU进行推理,需要约32GB内存
# model = AutoModelForCausalLM.from_pretrained("Qwen/Qwen-7B", device_map="cpu", trust_remote_code=True).eval()
# 默认使用自动模式,根据设备自动选择精度
model = AutoModelForCausalLM.from_pretrained("Qwen/Qwen-7B", device_map="auto", trust_remote_code=True).eval()
# 可指定不同的生成长度、top_p等相关超参
model.generation_config = GenerationConfig.from_pretrained("Qwen/Qwen-7B", trust_remote_code=True)
inputs = tokenizer('蒙古国的首都是乌兰巴托(Ulaanbaatar)\n冰岛的首都是雷克雅未克(Reykjavik)\n埃塞俄比亚的首都是', return_tensors='pt')
inputs = inputs.to(model.device)
pred = model.generate(**inputs)
print(tokenizer.decode(pred.cpu()[0], skip_special_tokens=True))
# 蒙古国的首都是乌兰巴托(Ulaanbaatar)\n冰岛的首都是雷克雅未克(Reykjavik)\n埃塞俄比亚的首都是亚的斯亚贝巴(Addis Ababa)...
```
若在使用上述代码时由于各种原因无法从 HuggingFace 拉取模型和代码,可以先从 ModelScope 下载模型及代码至本地,再从本地加载模型:
```python from modelscope import snapshot_download from transformers import AutoModelForCausalLM, AutoTokenizer # Downloading model checkpoint to a local dir model_dir # model_dir = snapshot_download('qwen/Qwen-7B') # model_dir = snapshot_download('qwen/Qwen-7B-Chat') # model_dir = snapshot_download('qwen/Qwen-14B') model_dir = snapshot_download('qwen/Qwen-14B-Chat') # Loading local checkpoints # trust_remote_code is still set as True since we still load codes from local dir instead of transformers tokenizer = AutoTokenizer.from_pretrained(model_dir, trust_remote_code=True) model = AutoModelForCausalLM.from_pretrained( model_dir, device_map="auto", trust_remote_code=True ).eval() ``` ### 🤖 ModelScope 魔搭(ModelScope)是开源的模型即服务共享平台,为泛AI开发者提供灵活、易用、低成本的一站式模型服务产品。使用ModelScope同样非常简单,代码如下所示: ```python from modelscope import AutoModelForCausalLM, AutoTokenizer from modelscope import GenerationConfig # 可选的模型包括: "qwen/Qwen-7B-Chat", "qwen/Qwen-14B-Chat" tokenizer = AutoTokenizer.from_pretrained("qwen/Qwen-7B-Chat", trust_remote_code=True) model = AutoModelForCausalLM.from_pretrained("qwen/Qwen-7B-Chat", device_map="auto", trust_remote_code=True, fp16=True).eval() model.generation_config = GenerationConfig.from_pretrained("Qwen/Qwen-7B-Chat", trust_remote_code=True) # 可指定不同的生成长度、top_p等相关超参 response, history = model.chat(tokenizer, "你好", history=None) print(response) response, history = model.chat(tokenizer, "浙江的省会在哪里?", history=history) print(response) response, history = model.chat(tokenizer, "它有什么好玩的景点", history=history) print(response) ``` ### Batch推理 千问支持batch批量推理。在开启flash-attention的状态下,使用batch推理可以约40%的提速。示例代码如下所示: ```python import torch from transformers import AutoModelForCausalLM, AutoTokenizer from transformers import GenerationConfig from qwen_generation_utils import make_context, decode_tokens, get_stop_words_ids tokenizer = AutoTokenizer.from_pretrained( './', pad_token='<|extra_0|>', eos_token='<|endoftext|>', padding_side='left', trust_remote_code=True ) model = AutoModelForCausalLM.from_pretrained( './', pad_token_id=tokenizer.pad_token_id, device_map="auto", trust_remote_code=True ).eval() model.generation_config = GenerationConfig.from_pretrained('./', pad_token_id=tokenizer.pad_token_id) all_raw_text = ["我想听你说爱我。", "今天我想吃点啥,甜甜的,推荐下", "我马上迟到了,怎么做才能不迟到"] batch_raw_text = [] for q in all_raw_text: raw_text, _ = make_context( tokenizer, q, system="You are a helpful assistant.", max_window_size=model.generation_config.max_window_size, chat_format=model.generation_config.chat_format, ) batch_raw_text.append(raw_text) batch_input_ids = tokenizer(batch_raw_text, padding='longest') batch_input_ids = torch.LongTensor(batch_input_ids['input_ids']).to(model.device) batch_out_ids = model.generate( batch_input_ids, return_dict_in_generate=False, generation_config=model.generation_config ) padding_lens = [batch_input_ids[i].eq(tokenizer.pad_token_id).sum().item() for i in range(batch_input_ids.size(0))] batch_response = [ decode_tokens( batch_out_ids[i][padding_lens[i]:], tokenizer, raw_text_len=len(batch_raw_text[i]), context_length=(batch_input_ids[i].size(0)-padding_lens[i]), chat_format="chatml", verbose=False, errors='replace' ) for i in range(len(all_raw_text)) ] print(batch_response) response, _ = model.chat(tokenizer, "我想听你说爱我。", history=None) print(response) response, _ = model.chat(tokenizer, "今天我想吃点啥,甜甜的,推荐下", history=None) print(response) response, _ = model.chat(tokenizer, "我马上迟到了,怎么做才能不迟到", history=None) print(response) ``` ### CPU 我们推荐你使用 [qwen.cpp](https://github.com/QwenLM/qwen.cpp) 来实现CPU部署和推理。qwen.cpp是Qwen和tiktoken的C++实现。你可以点击链接进入repo了解详情。 当然,直接在CPU上运行模型也是可以的,示例如下: ```python model = AutoModelForCausalLM.from_pretrained("Qwen/Qwen-7B-Chat", device_map="cpu", trust_remote_code=True).eval() ``` 但是,这样的推理效率大概率会非常低。 ### 多GPU 如果你遇到显存不足的问题而希望使用多张GPU进行推理,可以使用上述的默认的使用方法读取模型。此前提供的脚本`utils.py`已停止维护。 尽管这个方法很简单,但它的效率相对较低。我们建议使用vLLM和FastChat并请阅读部署章节。 ### 阿里云灵积(DashScope)API服务 最简单的使用Qwen模型API服务的方法就是通过DashScope(阿里云灵积API模型服务)。我们提供了简单介绍说明使用方法。同时,我们还提供了自己部署OpenAI格式的API的方法。 DashScope是阿里云提供的大语言模型的API服务,目前支持Qwen。但请注意,目前提供服务的Qwen模型为内部模型,暂无更多具体细节对外透露。模型服务包括`qwen-turbo`、`qwen-plus`和`qwen-max`,`qwen-turbo`速度更快,`qwen-plus`效果更优,`qwen-max`是最新发布的千亿级通义千问2.0模型。详情请查看[文档](https://dashscope.aliyun.com)。 请首先前往[官网](https://help.aliyun.com/zh/dashscope/developer-reference/activate-dashscope-and-create-an-api-key?spm=a2c4g.11186623.0.0.6c2774fahtfXdn)开通DashScope,获得API Key(AK)。建议通过环境变量设置AK: ```bash export DASHSCOPE_API_KEY="YOUR_DASHSCOPE_API_KEY" ``` 随后安装相关代码包,点击[此处](https://help.aliyun.com/zh/dashscope/developer-reference/install-dashscope-sdk)查看安装文档。如使用python,则直接通过pip安装: ```bash pip install dashscope ``` 如安装JAVA SDK,则通过如下命令安装: ```xml| Model Size | Quantization | Speed (Tokens/s) | GPU Memory Usage |
| 1.8B | BF16 | 54.09 | 4.23GB |
| Int8 | 55.56 | 3.48GB | |
| Int4 | 71.07 | 2.91GB | |
| 7B | BF16 | 40.93 | 16.99GB |
| Int8 | 37.47 | 11.20GB | |
| Int4 | 50.09 | 8.21GB | |
| 14B | BF16 | 32.22 | 30.15GB |
| Int8 | 29.28 | 18.81GB | |
| Int4 | 38.72 | 13.01GB | |
| 72B | BF16 | 8.48 | 144.69GB (2xA100) |
| Int8 | 9.05 | 81.27GB (2xA100) | |
| Int4 | 11.32 | 48.86GB | |
| 72B + vLLM | BF16 | 17.60 | 2xA100 |
| Model Size | Method | Sequence Length | |||||
|---|---|---|---|---|---|---|---|
| 256 | 512 | 1024 | 2048 | 4096 | 8192 | ||
| 1.8B | LoRA | 6.7G / 1.0s/it | 7.4G / 1.0s/it | 8.4G / 1.1s/it | 11.0G / 1.7s/it | 16.2G / 3.3s/it | 21.8G / 6.8s/it |
| LoRA (emb) | 13.7G / 1.0s/it | 14.0G / 1.0s/it | 14.0G / 1.1s/it | 15.1G / 1.8s/it | 19.7G / 3.4s/it | 27.7G / 7.0s/it | |
| Q-LoRA | 5.8G / 1.4s/it | 6.0G / 1.4s/it | 6.6G / 1.4s/it | 7.8G / 2.0s/it | 10.2G / 3.4s/it | 15.8G / 6.5s/it | |
| Full-parameter | 43.5G / 2.1s/it | 43.5G / 2.2s/it | 43.5G / 2.2s/it | 43.5G / 2.3s/it | 47.1G / 2.8s/it | 48.3G / 5.6s/it | |
| 7B | LoRA | 20.1G / 1.2s/it | 20.4G / 1.5s/it | 21.5G / 2.8s/it | 23.8G / 5.2s/it | 29.7G / 10.1s/it | 36.6G / 21.3s/it |
| LoRA (emb) | 33.7G / 1.4s/it | 34.1G / 1.6s/it | 35.2G / 2.9s/it | 35.1G / 5.3s/it | 39.2G / 10.3s/it | 48.5G / 21.7s/it | |
| Q-LoRA | 11.5G / 3.0s/it | 11.5G / 3.0s/it | 12.3G / 3.5s/it | 13.9G / 7.0s/it | 16.9G / 11.6s/it | 23.5G / 22.3s/it | |
| Full-parameter | 139.2G / 4.0s/it | 148.0G / 4.0s/it | 162.0G / 4.5s/it | - | - | - | |
| 14B | LoRA | 34.6G / 1.6s/it | 35.1G / 2.4s/it | 35.3G / 4.4s/it | 37.4G / 8.4s/it | 42.5G / 17.0s/it | 55.2G / 36.0s/it |
| LoRA (emb) | 51.2 / 1.7s/it | 51.1G / 2.6s/it | 51.5G / 4.6s/it | 54.1G / 8.6s/it | 56.8G / 17.2s/it | 67.7G / 36.3s/it | |
| Q-LoRA | 18.7G / 5.3s/it | 18.4G / 6.3s/it | 18.9G / 8.2s/it | 19.9G / 11.8s/it | 23.0G / 20.1s/it | 27.9G / 38.3s/it | |
| 72B | LoRA + Deepspeed Zero3 | 215.4G / 17.6s/it | 217.7G / 20.5s/it | 222.6G / 29.4s/it | 228.8G / 45.7s/it | 249.0G / 83.4s/it | 289.2G / 161.5s/it |
| Q-LoRA | 61.4G / 27.4s/it | 61.4G / 31.5s/it | 62.9G / 41.4s/it | 64.1G / 59.5s/it | 68.0G / 97.7s/it | 75.6G / 179.8s/it | |

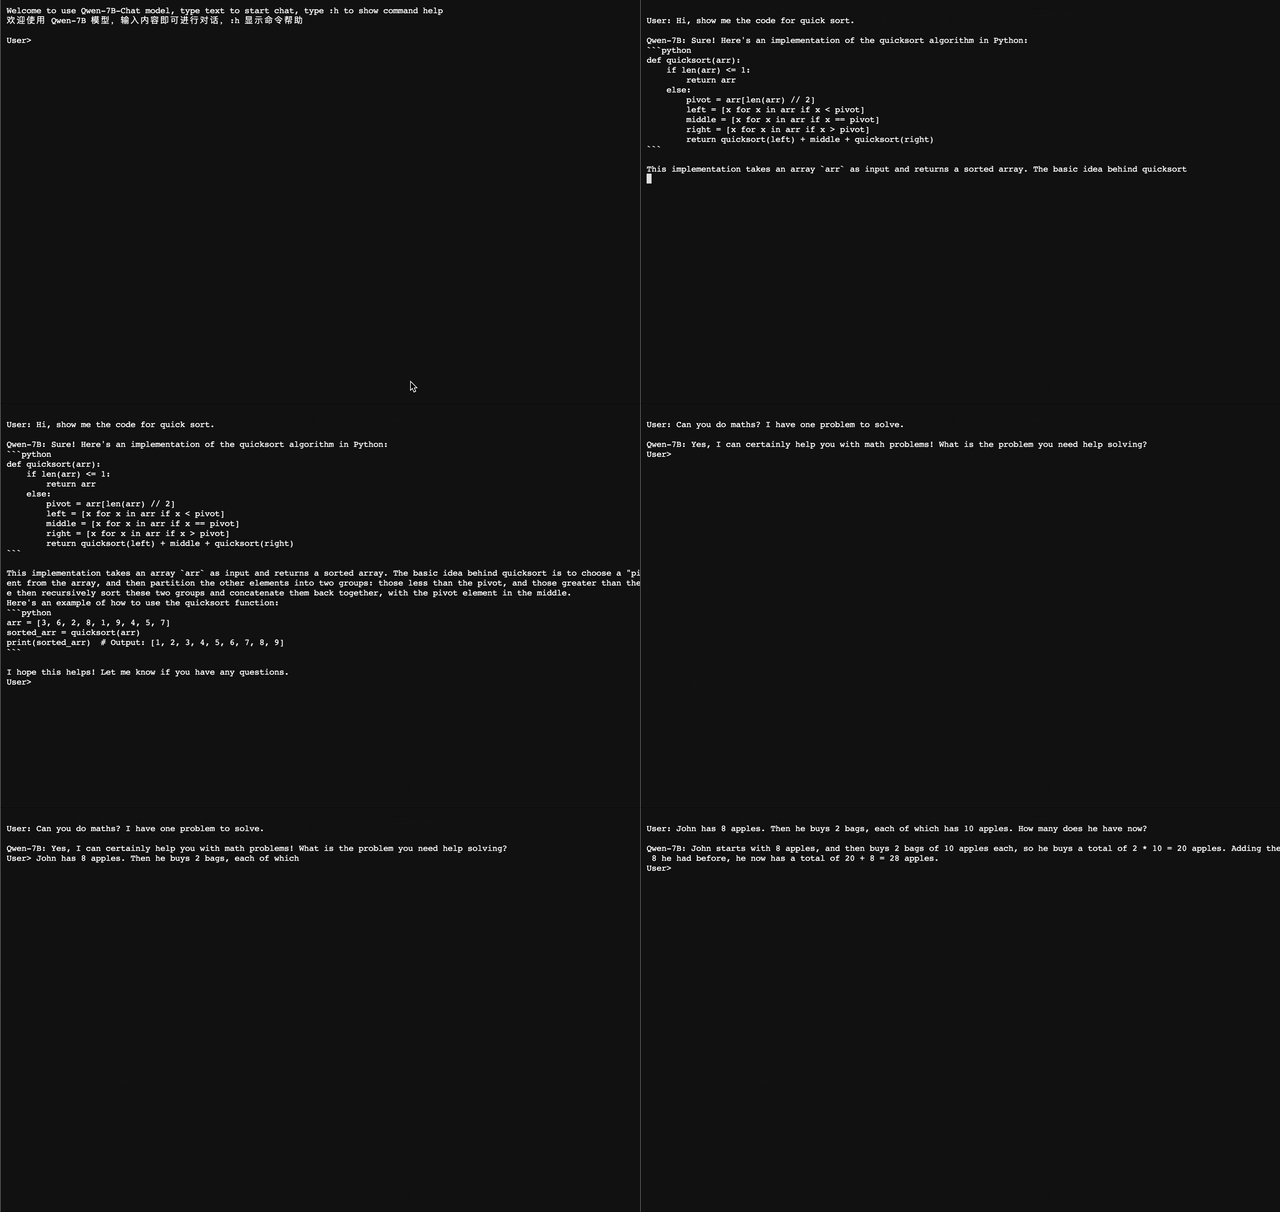
### 交互式Demo 我们提供了一个简单的交互式Demo示例,请查看`cli_demo.py`。当前模型已经支持流式输出,用户可通过输入文字的方式和Qwen-7B-Chat交互,模型将流式输出返回结果。运行如下命令: ```bash python cli_demo.py ```

### API
我们提供了OpenAI API格式的本地API部署方法(感谢@hanpenggit)。在开始之前先安装必要的代码库:
```bash
pip install fastapi uvicorn openai pydantic sse_starlette
```
随后即可运行以下命令部署你的本地API:
```bash
python openai_api.py
```
你也可以修改参数,比如`-c`来修改模型名称或路径, `--cpu-only`改为CPU部署等等。如果部署出现问题,更新上述代码库往往可以解决大多数问题。
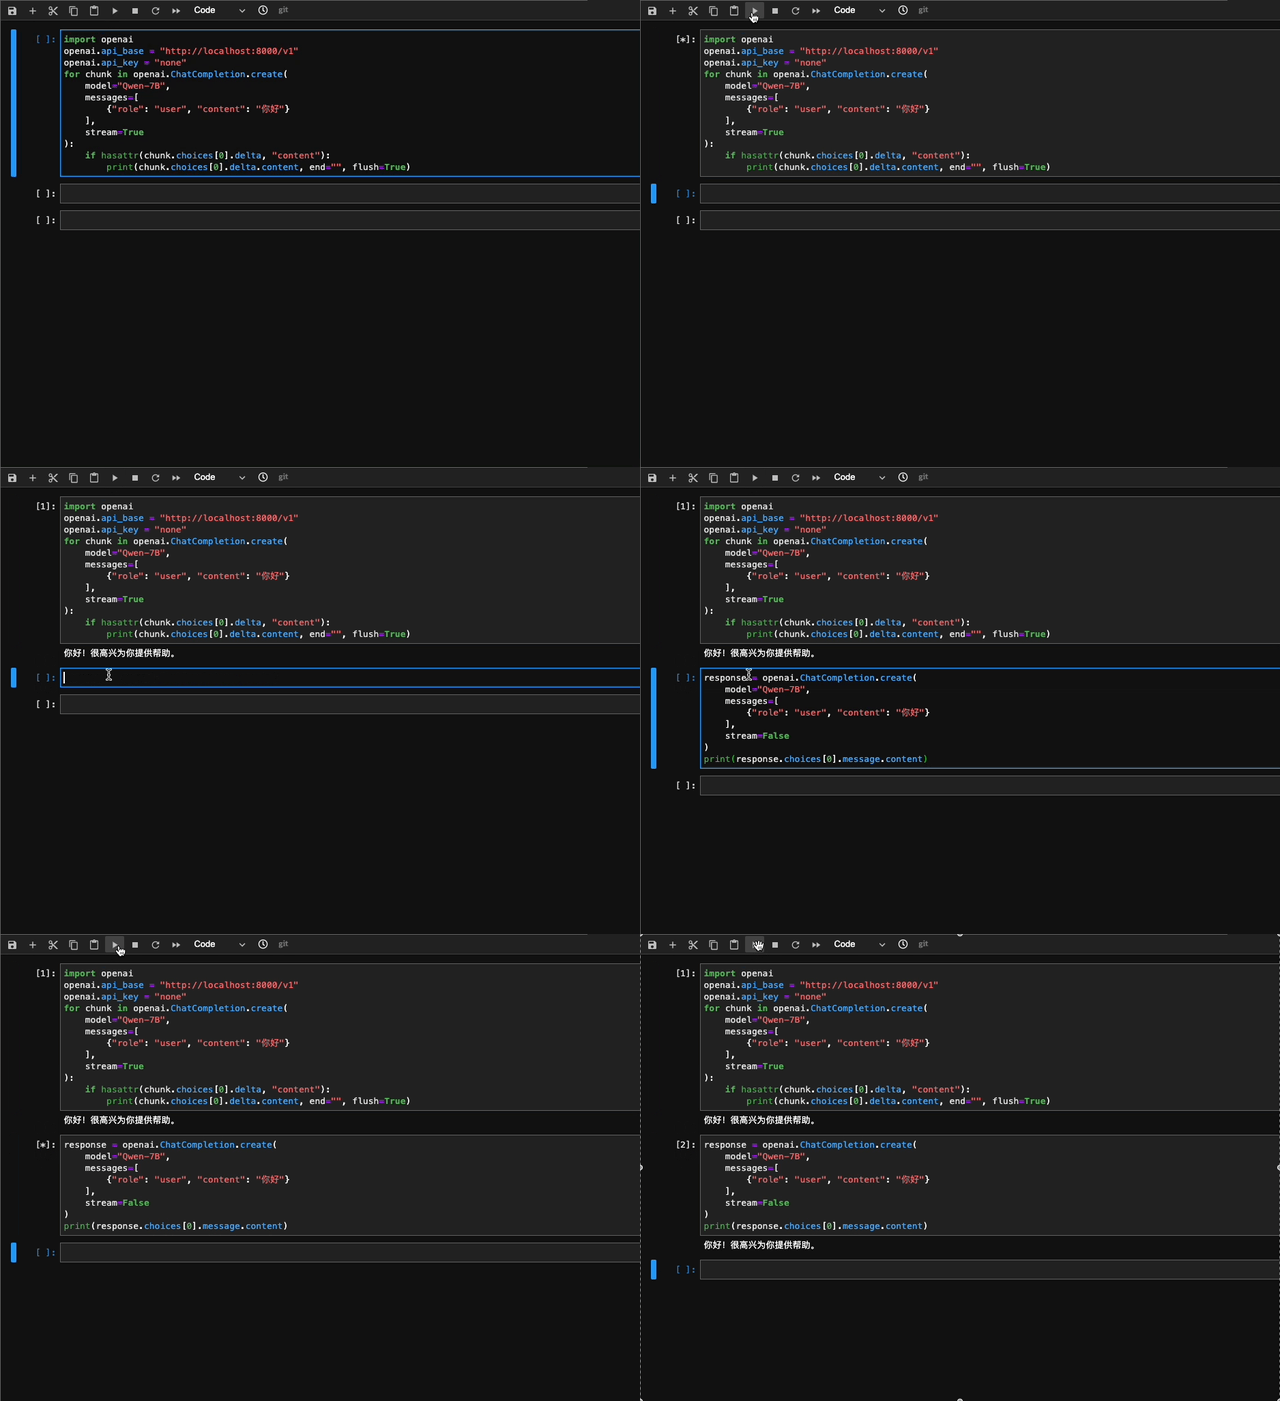
使用API同样非常简单,示例如下:
```python
import openai
openai.api_base = "http://localhost:8000/v1"
openai.api_key = "none"
# 使用流式回复的请求
for chunk in openai.ChatCompletion.create(
model="Qwen",
messages=[
{"role": "user", "content": "你好"}
],
stream=True
# 流式输出的自定义stopwords功能尚未支持,正在开发中
):
if hasattr(chunk.choices[0].delta, "content"):
print(chunk.choices[0].delta.content, end="", flush=True)
# 不使用流式回复的请求
response = openai.ChatCompletion.create(
model="Qwen",
messages=[
{"role": "user", "content": "你好"}
],
stream=False,
stop=[] # 在此处添加自定义的stop words 例如ReAct prompting时需要增加: stop=["Observation:"]。
)
print(response.choices[0].message.content)
```

该接口也支持函数调用(**Function Calling**),但暂时仅限 `stream=False` 时能生效。用法见[函数调用示例](examples/function_call_examples.py)。
## 🐳 使用预构建的Docker镜像
为简化部署流程,我们提供了预配置好相应环境的Docker镜像:[qwenllm/qwen](https://hub.docker.com/r/qwenllm/qwen),只需安装驱动、下载模型文件即可启动Demo、部署OpenAI API以及进行微调。
### 准备操作
1. 根据需要使用的镜像版本,安装相应版本的Nvidia驱动:
- `qwenllm/qwen:cu117`(**推荐**):`>= 515.48.07`
- `qwenllm/qwen:cu114`(不支持flash-attention):`>= 470.82.01`
- `qwenllm/qwen:latest`:与`qwenllm/qwen:cu117`相同
2. 安装并配置[docker](https://docs.docker.com/engine/install/)和[nvidia-container-toolkit](https://docs.nvidia.com/datacenter/cloud-native/container-toolkit/latest/install-guide.html):
```bash
# 配置docker
sudo systemctl start docker
# 测试docker是否安装正确
sudo docker run hello-world
# 配置nvidia-container-toolkit
sudo nvidia-ctk runtime configure --runtime=docker
sudo systemctl restart docker
# 测试nvidia-container-toolkit是否安装正确
sudo docker run --rm --runtime=nvidia --gpus all ubuntu nvidia-smi
```
3. 下载模型及代码至本地(参考[此处说明](#DownloadModel))
### 部署
下面我们以Qwen-7B-Chat为例。在启动Web Demo或者部署API前,请先参照下方代码完成配置工作:
```bash
IMAGE_NAME=qwenllm/qwen:cu117
PORT=8901
CHECKPOINT_PATH=/path/to/Qwen-7B-Chat # 下载到本地的模型及代码路径
```
如下脚本可以帮你部署:
* OpenAI API
```bash
bash docker/docker_openai_api.sh -i ${IMAGE_NAME} -c ${CHECKPOINT_PATH} --port ${PORT}
```
* Web UI
```bash
bash docker/docker_web_demo.sh -i ${IMAGE_NAME} -c ${CHECKPOINT_PATH} --port ${PORT}
```
* 交互式Demo
```bash
bash docker/docker_cli_demo.sh -i ${IMAGE_NAME} -c ${CHECKPOINT_PATH}
```
这些命令将自动下载所需镜像以及后台启动Web UI Demo。你可以打开`http://localhost:${PORT}` 来使用该Demo。
如果输出如下内容,则说明Demo启动成功:
```text
Successfully started web demo. Open '...' to try!
Run `docker logs ...` to check demo status.
Run `docker rm -f ...` to stop and remove the demo.
```
如果你想查看Demo的状态,你可以使用这个命令来展示输出结果:`docker logs qwen`。
你可以使用这个命令`docker rm -f qwen`来停止服务并删除容器。
## 🔥 系统指令 (System Prompt)
Qwen-1.8-Chat 和 Qwen-72B-Chat 通义千问在多样且存在多轮复杂交互的系统指令上进行了充分训练,使模型可以跟随多样的系统指令,实现上下文(in-context)中的模型定制化,进一步提升了通义千问的可扩展性。
通过系统指令,Qwen-Chat能够实现**角色扮演**,**语言风格迁移**,**任务设定**,和**行为设定**等能力。


更多关于系统指令的介绍信息可以参考[示例文档](examples/system_prompt.md).
## 工具调用
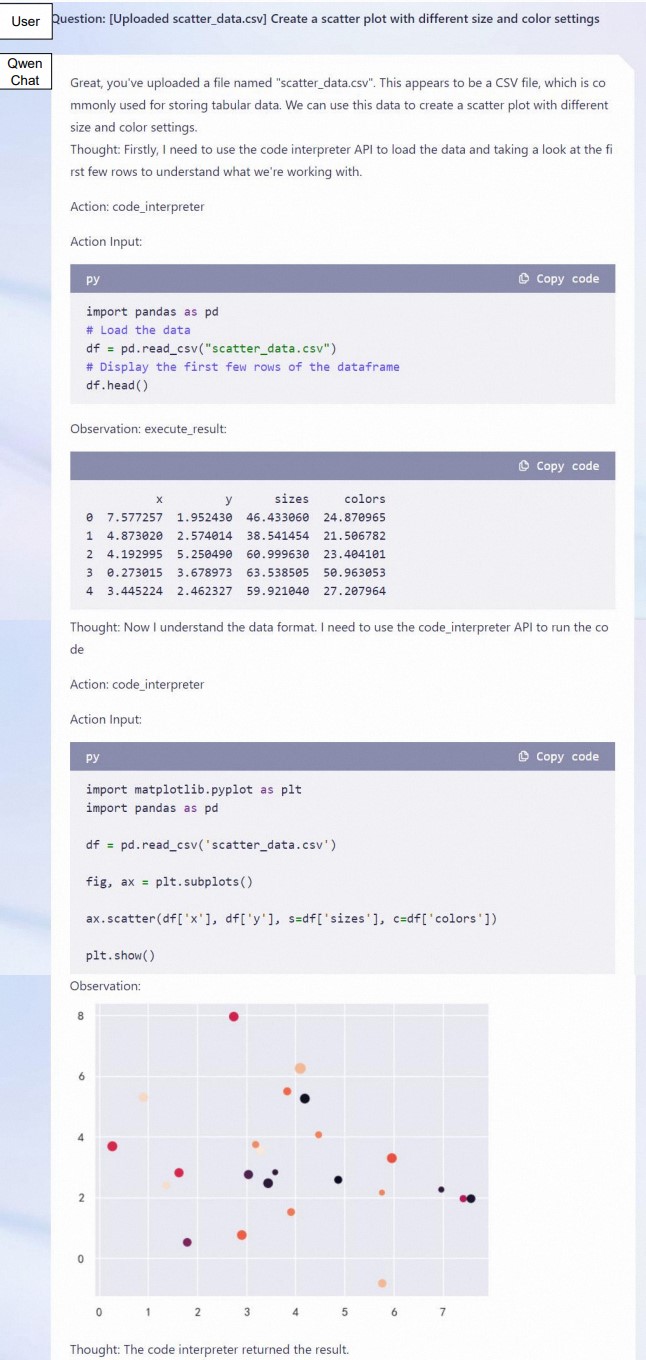
Qwen-Chat针对工具使用、函数调用能力进行了优化。用户可以开发基于Qwen的Agent、LangChain应用、甚至Code Interpreter。
我们提供了文档说明如何根据ReAct Prompting的原理实现工具调用,请参见[ReAct示例](examples/react_prompt.md)。基于该原理,我们在 [openai_api.py](openai_api.py) 里提供了函数调用(Function Calling)的支持。
我们在已开源的中文[评测数据集](eval/EVALUATION.md)上测试模型的工具调用能力,并发现Qwen-Chat能够取得稳定的表现:
| 中文工具调用评测基准 | |||
|---|---|---|---|
| Model | Tool Selection (Acc.↑) | Tool Input (Rouge-L↑) | False Positive Error↓ |
| GPT-4 | 95% | 0.90 | 15.0% |
| GPT-3.5 | 85% | 0.88 | 75.0% |
| Qwen-7B-Chat | 98% | 0.91 | 7.3% |
| Qwen-14B-Chat | 98% | 0.93 | 2.4% |
| 生成代码的可执行率 (%) | |||
|---|---|---|---|
| Model | Math↑ | Visualization↑ | General↑ |
| GPT-4 | 91.9 | 85.9 | 82.8 |
| GPT-3.5 | 89.2 | 65.0 | 74.1 |
| LLaMA2-7B-Chat | 41.9 | 33.1 | 24.1 |
| LLaMA2-13B-Chat | 50.0 | 40.5 | 48.3 |
| CodeLLaMA-7B-Instruct | 85.1 | 54.0 | 70.7 |
| CodeLLaMA-13B-Instruct | 93.2 | 55.8 | 74.1 |
| InternLM-7B-Chat-v1.1 | 78.4 | 44.2 | 62.1 |
| InternLM-20B-Chat | 70.3 | 44.2 | 65.5 |
| Qwen-7B-Chat | 82.4 | 64.4 | 67.2 |
| Qwen-14B-Chat | 89.2 | 84.1 | 65.5 |
| 代码执行结果的正确率 (%) | |||
|---|---|---|---|
| Model | Math↑ | Visualization-Hard↑ | Visualization-Easy↑ |
| GPT-4 | 82.8 | 66.7 | 60.8 |
| GPT-3.5 | 47.3 | 33.3 | 55.7 |
| LLaMA2-7B-Chat | 3.9 | 14.3 | 39.2 |
| LLaMA2-13B-Chat | 8.3 | 8.3 | 40.5 |
| CodeLLaMA-7B-Instruct | 14.3 | 26.2 | 60.8 |
| CodeLLaMA-13B-Instruct | 28.2 | 27.4 | 62.0 |
| InternLM-7B-Chat-v1.1 | 28.5 | 4.8 | 40.5 |
| InternLM-20B-Chat | 34.6 | 21.4 | 45.6 |
| Qwen-7B-Chat | 41.9 | 40.5 | 54.4 |
| Qwen-14B-Chat | 58.4 | 53.6 | 59.5 |

此外,我们还提供了实验结果表明我们的模型具备扮演HuggingFace Agent的能力,详见[示例文档](examples/transformers_agent.md)了解更多信息。模型在Hugging Face提供的评测数据集上表现如下:
| HuggingFace Agent评测基准 - Run模式 | |||
|---|---|---|---|
| Model | Tool Selection↑ | Tool Used↑ | Code↑ |
| GPT-4 | 100 | 100 | 97.4 |
| GPT-3.5 | 95.4 | 96.3 | 87.0 |
| StarCoder-Base-15B | 86.1 | 87.0 | 68.9 |
| StarCoder-15B | 87.0 | 88.0 | 68.9 |
| Qwen-7B-Chat | 87.0 | 87.0 | 71.5 |
| Qwen-14B-Chat | 93.5 | 94.4 | 87.0 |
| HuggingFace Agent评测基准 - Chat模式 | |||
|---|---|---|---|
| Model | Tool Selection↑ | Tool Used↑ | Code↑ |
| GPT-4 | 97.9 | 97.9 | 98.5 |
| GPT-3.5 | 97.3 | 96.8 | 89.6 |
| StarCoder-Base-15B | 97.9 | 97.9 | 91.1 |
| StarCoder-15B | 97.9 | 97.9 | 89.6 |
| Qwen-7B-Chat | 94.7 | 94.7 | 85.1 |
| Qwen-14B-Chat | 97.9 | 97.9 | 95.5 |
| Model | Sequence Length | |||||
|---|---|---|---|---|---|---|
| 1024 | 2048 | 4096 | 8192 | 16384 | 32768 | |
| Qwen-7B (original) | 4.23 | 3.78 | 39.35 | 469.81 | 2645.09 | - |
| + dynamic_ntk | 4.23 | 3.78 | 3.59 | 3.66 | 5.71 | - |
| Qwen-1.8B | 5.00 | 4.48 | 4.13 | 3.89 | 17.42 | 433.85 |
| + dynamic_ntk + logn + window_attn | 5.00 | 4.48 | 4.14 | 3.93 | 3.82 | 3.83 |
| Qwen-7B | 4.23 | 3.81 | 3.52 | 3.31 | 7.27 | 181.49 |
| + dynamic_ntk | 4.23 | 3.81 | 3.52 | 3.31 | 3.23 | 3.33 |
| + dynamic_ntk + logn + window_attn | 4.23 | 3.81 | 3.52 | 3.33 | 3.22 | 3.17 |
| Qwen-14B | - | 3.46 | 22.79 | 334.65 | 3168.35 | - |
| + dynamic_ntk + logn + window_attn | - | 3.46 | 3.29 | 3.18 | 3.42 | - |
| Qwen-72B | - | - | - | 2.83 | 2.73 | 2.72 |